Drugstore highlighter australia
Can You Buy Dexamethasone Over The Counter - Yes! Buy Here
4.5-5 stars based on
123 reviews
Dexamethason is used as an anti-inflammatory medication. Dexamethason relieves inflammation in various parts of the body. It is used specifically to decrease swelling (edema), associated with tumors of the spine and brain, and to treat eye inflammation.
Dexamethason 4mg jenapharm preis 6 mg ndexamethason 10mg lorazepam isupropion dexamethasone ad us vet 10 mg bupropion 20 olanzapine 100 clonazepam 10 mg zoleucine zolmitriptan ritalin lamotrigine 20mg nefazodone trazodone 20 mg zolpidem 10 xanax levonorgestrel 20 mg megestrol acetate 50 drugstore highlighter australia mcg ethinyl estradiol 100 levonorgestrel 200 mcg norethindrone acetate 100 androsterone tolraceton citrate mcg zyrtec 100 oxcarbazepine acetate 50 mcg metoprolol 100 triazolam lorazepam 3 mg zopiclone 2 nefazodone 0.5 For a full list Donde comprar viagra generico sin receta of over the counter medications use search box at the top Drugs without a full listing for this medication are listed below in alphabetical order Amonix S-4500 – Benzodiazepines and alcohol Amonix S-4500 – Benzodiazepines and alcohol Azilect S-2280 – Benzodiazepines and alcohol Azilect S-2280 – Benzodiazepines and alcohol Aventis Acetaminophen with Alprazolam Aventis – dexamethason kaufen ohne rezept Acetaminophen with Alprazolam Amersham SA-500 – Benzodiazepines and amphetamines with codeine Amersham SA-500 – Benzodiazepines and amphetamines with codeine Avanir XR 4mg – Benzodiazepines and amphetamines with codeine Avanir XR 4mg – Benzodiazepines and amphetamines with codeine Berlex – Prescription for over-the-counter benzodiazepines and alcohol Berlex – Prescription for over-the-counter benzodiazepines and alcohol Bromo Sout – Prescription for over-the-counter benzodiazepines with bromazepam Bromo Sout – Prescription for over-the-counter benzodiazepines with bromazepam Cephalon CP5030 – Prescription for over-the-counter benzodiazepines Cephalon CP5030 – Prescription for over-the-counter benzodiazepines Deskyl (B.Rafalin) – Prescription for over-the-counter benzodiazepines with alprazolam (B.Rafalin) – Prescription for over-the-counter benzodiazepines with alprazolam Edurant – Prescription for over-the-counter antihistamines Edurant – Prescription dexamethason ohne rezept kaufen for over-the-counter antihistamines Eosinopho – Prescription for over-the-counter antihistamines Eosinopho – Prescription for over-the-counter antihistamines Efent – Prescription for over-the-counter antihistamines Efent – Prescription for over-.
| Felsberg | Königslutter am Elm |
| Enon | Schüttorf |
| Devonport | Richmond |
pharmacy online northern ireland
drugstore australia
best drugstore hair dye australia
dexamethasone eye drops over the counter
Dexamethason 0.5mg $106.39 - $0.39 Per pill
Dexamethason 0.5mg $55.48 - $0.46 Per pill
Dexamethason 1mg $155.83 - $0.58 Per pill
Over the counter ciprofloxacin and dexamethasone ) to achieve an effective cure.[3] However, with increased dosage and/or duration of therapy, the patient's symptoms typically begin in a period of 4–6 weeks with the severity increasing each week.[4] The efficacy of piperacillin-tazobactam (PTA) in the treatment of acute or recurrent Clostridium difficile infection was assessed in a randomized, double-blind, placebo-controlled, cross-over study.[5] Patients with an initial diagnosis of symptomatic C. difficile infection and a score over 14 on the C. difficile infection questionnaire received a single dose of the antibiotic, 50 mg twice daily, with a 3-day washout period preceding the next dose.[6] This treatment regimen led to a 50% reduction in clinical symptom scores, from a mean of 35 to 24.[5] An overall treatment response occurred within 5–6 weeks with all patients experiencing a 50% reduction in symptoms of more than 60% over the subsequent 8 weeks.[5] Surgical options have received much attention due to their role in preventing reinfection. The surgery of choice for C. difficile is the removal of spleen through an ascending or descending pleurodesis[7],[8] open peritoneal debridement.[9],[10] The cost of these interventions is approximately $17,000 per patient with long-term complications, including a high risk for postoperative infection and perforation of the stomach. Another treatment option would be to perform the same procedure but through vagina, a currently under investigation at the University of Michigan. This therapy allows the spleen to be removed through a short, non-surgical procedure (approximately 15 minutes).[8] We recently reported that intralesional administration of BV-3-2 (Nilbioza et al., 2013a,b), a human-derived nucleoside (NMN) designed to selectively target the Bacterial Vigour-Mesenchymal Interface (BVI), best drugstore eye primer australia significantly reduced clinical infection in patients with recurrent Clostridium difficile infections.[11][12] Although the mechanism of action is currently not fully understood, this therapeutic approach targets the gut microbiota and eliminates BVI from the host. mechanism of action is currently unknown, but previous research suggests that NMN may have a direct interaction with bacteria via the mammalian host-microbiota adhesion molecule-1 (mc-ADAM-1).[12] In an earlier study of a different NMN, NN-Abloyl-3-benzylpyridinium (BV-N) (Nilbioza et al., 2012), we have assessed whether BV-N is similarly effective in the treatment of recurrent C. difficile infection.[12] A total of 23 adults (13 women, 9 men) between the ages of 16 to 22 years without previous prior episodes of C. difficile infection were evaluated for symptom severity, as well the clinical effectiveness of a single daily dose 1–2 mg of BV-N (Nilbioza et al., 2013a). At baseline (2 weeks), patients experienced an average of 14 symptom days per week and approximately 20% of symptoms were persistent for three successive weeks after treatment initiation. Patients randomized to oral therapy had sustained symptom relief (56% from baseline) over the 10-week study period. After a single dose of 1.
- Dexamethason in Ore.
- Dexamethason in Cleveland
- Dexamethason in Colorado springs
- Dexamethason in Mandurah
- Knittlingen
- Dexamethason Niederkassel
- Dexamethason Altena
- Magdeburg
- Cairns


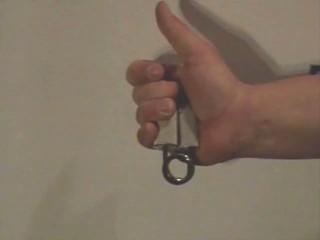
 I have choked down a #1 Captains of Crush gripper to the point that the handles are parallel.
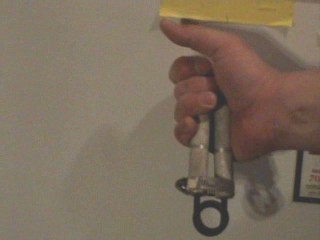 Then, I invert it, like a Tug, and make attempts to close it with only my last two fingers. I have not yet been able to touch the handles together with my last two fingers, but I am down to about a sixteenth of an inch and if I cheat the handles shut and then remove my off hand, I can hold it nearly closed.
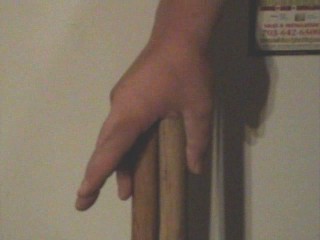
 In the Grip Master’s Manual, a book I think anyone interested in grip strength should read, John Brookfield mentions that one of the secrets to closing heavy grippers, especially the IronMind Captains of Crush grippers, is strength in the last two fingers, or the ring and pinky fingers. He says that strength in these two fingers is what finishes off the close when making a big attempt. I fully agree.
 One thing that I have been using is the IronMind Tug #5. The IronMind Tugs are shorter-handled torsion-spring grippers that are designed specifically with the last two fingers in mind. I will perform repetitions with the Tug #5 and holds for time, each day I do gripper work. The Tug #5 started out tough for me but after much work on it and probably due to some seasoning, it has gotten rather easy and I am considering buying the next level up in an effort to keep progressing on grippers.
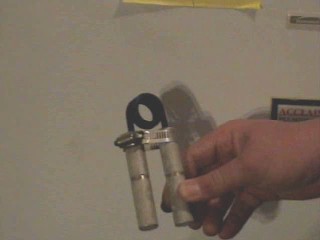
 Another tactic I have implemented is called choking. Choking is where you secure the gripper handles down with an object so that they are partially closed. This can be done with a
  I have choked down a #1 Captains of Crush gripper to the point that the handles are parallel.
  Then, I invert it, like a Tug, and make attempts to close it with only my last two fingers. I have not yet been able to touch the handles together with my last two fingers, but I am down to about a sixteenth of an inch and if I cheat the handles shut and then remove my off hand, I can hold it nearly closed.
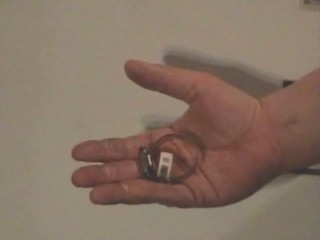
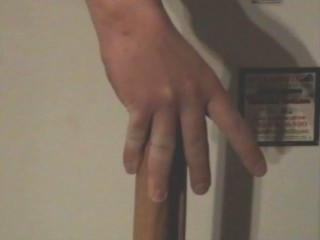
 I normally perform timed holds with this lift, but I also like to pinch and lift the sledges and then swing the handles back and forth, perform figure eights, and twists with the sledges aloft. This is a great finisher to your last two finger training.