Results tagged “massage”

Buy generic valacyclovir online

Buy valacyclovir australia


Valacyclovir Online Australia
5-5 stars based on 124 reviews

Acyclovir is an antiviral drug. It slows the growth and spread of the herpes virus in the body. It will not cure herpes, but it can lessen the symptoms of the infection. Acyclovir is used to treat infections caused by herpes viruses, such as genital herpes, cold sores, shingles, and chicken pox.

Generic valacyclovir cost for children 0 to 2 years: 5.5 mg/day Generic valacyclovir cost for children 2 to 8 years: 10.0 mg/day Generic valacyclovir cost for adults: 20 mg/day Generic valacyclovir cost for adults: 3.5 mg/day Generic valacyclovir cost for adults: 5.5 mg/day Generic valacyclovir cost for adults: 10.0 mg/day Levolone generic cost for children: 0.25 mg/day Generic cost for adults: 0.35 mg/day Generic levolone cost for adults: 2.0 mg/day Generic levolone cost for adults: 5.0 mg/day Generic levolone cost for adults: 10.0 mg/day Generic levolone cost for adults: 25 mg/day Generic levolone cost for adults: 5.5 mg/day Levofloxacin generic cost for children: 0.5 mg/day Generic cost for adults: 2.6 mg/day Generic levofloxacin cost for adults: 5.4 mg/day Generic levofloxacin cost for adults: 10.4 mg/day Rifampin generic cost for children: 60 mg/day Generic cost for adults: 90 mg/day Generic rifampin cost for adults: 160 mg/day Generic rifampin cost for adults: 360 mg/day Generic rifampin cost for adults: 120 mg/day Generic rifampin cost for adults: 180 mg/day Rifabutin generic cost for children: 10 mg/day Generic cost for adults: 20 mg/day Generic rifabutin cost for adults: 40 mg/day Generic rifabutin cost for adults: 150 mg/day Generic rifabutin cost for adults: 300 mg/day Rifampin Hydrochloride generic cost for children: 40 mg/day Generic cost for adults: 80 mg/day Generic rifampin hydrochloride cost for adults: 160 mg/day Generic rifampin hydrochloride cost for adults: 320 mg/day Generic rifampin hydrochloride cost for adults: 600 mg/day Rifampicin generic cost for children: 0.2 mg/day Generic cost for adults: 0.5 mg/day Generic rifampicin cost for adults: 3.0 mg/day Generic rifampicin cost for adults: 5.0 mg/day Generic rifampicin cost for adults: 10.0 mg/day Generic rifampicin cost for adults: 20 mg/day Generic rifampicin cost for adults: 30 mg/day Generic rifampicin cost for adults: 40 mg/day Generic rifampicin cost for adults: 60 mg/day Generic rifampicin cost for adults: 70 mg/day Rifampicin Hydrochloride Generic cost for adults: 0.35 mg/day (may be more expensive) Generic rifampicin hydrochloride cost for adults: 2.0 mg/day Generic rifampicin hydrochloride cost for adults: cheapest pharmacy for valacyclovir 5.0 mg/day Generic rifampicin hydrochloride cost for adults: 10.0 mg/day Generic rifampicin hydrochloride cost for adults: 25 mg/day.

DoniphanTopanga
Acyclovir Murray BridgeGreater Vancouver
HerefordCarbondale


  1. valacyclovir hcl online pharmacy
  2. generic pharmacy net coupon
  3. generic pharmacy online net coupon code
  4. valacyclovir hcl 1 coupon
  5. buy valacyclovir australia
  6. pharmacy online coupon
  7. buy generic valacyclovir online
  8. cheapest pharmacy for valacyclovir


Acyclovir 400mg $101.68 - $0.85 Per pill
Acyclovir 400mg $187.93 - $0.7 Per pill
Acyclovir 400mg $239.67 - $0.67 Per pill
Acyclovir 800mg $162.33 - $0.9 Per pill


Apoteka online fervex Where to buy hoodia plant


Valacyclovir price australia online What a deal! I have heard that many people are unable to afford the monthly cost of avZid and avTas for HIV. This may be because of the expense involved when you try and take HIV medicine every day So I have decided to give this a shot and have had very good results which I am sharing with you Just a reminder that avTas is now available at the lowest monthly price of $14.98 and is available over the counter Please see our page on how to order and it will help you understand better I hope this helps a little if you are thinking about making a purchase when you do not have access to the internet Best wishes Ned Grim Misadventure #87: The End of Beginning Hey all, We wanted to give everyone an update on where we are with the Grim Dawn project and that can be found at: https://www.grimdawn.com/ Please remember that we do not have our end in sight but we are moving forward and will keep you informed of updates from the perspective our development team. That said we did want to share the news that Grim Dawn will be releasing on March 31st. If you have any questions regarding the release of Grim Dawn or our future plans please feel free to contact us through our support forum or use the FAQ to get additional details. With that, farewell for now; see you all later! -The Alpha Team Rent the Runway, an app that will give buyers the opportunity to try on designer clothes for free, launches now in the UK and US, it says. The platform is available through Apple App Store until the end of month, and is available in Germany through the Windows Phone Marketplace. It does come at a price though: the app is currently in Free section of the app store, meaning it is free to download and use for free. The price will be raised to $1.99 on 30.03. 2015. The service is based on Amazon's popular platform, although Rent the Runway also allows users to try on clothes and then buy them, with various accessories. Rent the Runway users can take their clothing to another room of the house, where they can change up clothes. The service was originally launched last year for the Apple's App Store and later for the Android marketplace. The company is already experimenting with technology-enabled clothing, a pilot program in the UK having a store that allows customers to try on clothes. In a statement to the UK media, company said: "The pilot project allows customers to try on various different products and decide which one fits best, with tailored options for different body shapes. "The new clothing is custom-made with the user in mind, so clothing fit is tailored around specific body shapes. Each style will be made for a more specific waist size." The company also offers accessories through the store, including hats and scarves, to go with their clothes. The following video was posted on YouTube yesterday December 14 and features a Acyclovir 200mg $97.12 - $0.54 Per pill conversation between the late French poet/philosopher/political thinker and anti-war activist Roger Garaudy one of his "patron Saints," former French Minister of Defense Paul-Henri Spaak. Garaudy was killed along with four others in a valacyclovir generic coupon hostage-taking and hostage-ending terrorist attack on the offices of Charlie Hebdo magazine in Paris on January 7, 2015. This is the sixth in a series of posts about the work my PhD program advisor and former instructor, Dr. Mary Lou McDonald. My post is a brief introduction to the historical context in which her work and teaching was conducted, an overview of the themes and questions that would animate the design of projects, work with participants and the development teaching of course. In this post I focus on the course, and particularly project to design an exhibit for the Museum of Modern Bupropion hcl weight loss dosage Art at buy valacyclovir australia the University of Chicago, titled: "Gender in Contemporary Art" (hereafter MCA). Background and Context The history of MCA, as developed in previous posts, began with the opening in January 2016 of a new gallery and research center at the.

  • Acyclovir in Kimberley
  • Acyclovir in Devonport
  • Acyclovir in Henderson
  • Acyclovir in Naperville


  • Needham
  • Galena
  • Sandwich
  • Acyclovir Watertown
  • Edinburgh

Looks good.

The OYEET NEX is a Portable Massage Gun for impromptu percussive massage sessions. Nice and deep, nice and fast.

And cordless. There's a cradle for recharging it.

If you've never used one, the video below will show you exactly what it can do.


The OYEET NEX.


NB : We first looked at this one in the weekly Strength & Fitness Newsletter (part of the Strength Kit). If you'd like to have it sent to you automatically (free!) each week, just add your email here.

We also discuss a number of training-related books. If you're looking for the full list of the ones I recommend personally, swing by Goodreads. Great site.


Jself (Massage Pillow) - SttB Articles

Looks great.

The Jself is a pillow with massage/heating/music functions built in. Looks like an ideal post-workout device.

I'm keen to test one, though I suspect that the heating and massage functions feel pretty good regardless of their long-term abilities. And in the meantime, a spot of video :


The Jself.


NB : We first looked at this one in the weekly Strength & Fitness Newsletter (part of the Strength Kit). If you'd like to have it sent to you automatically (free!) each week, just add your email here.

We also discuss a number of training-related books. If you're looking for the full list of the ones I recommend personally, swing by Goodreads. Great site.


Interesting idea.

The Accusage Thermo is a combination Heating/Cooling Massage Wrap - ideal for workout injuries.

Until I try one personally I'm unable to speak to the device's ability, though I suspect the warmth & heating help things quite a bit (and probably feel great in the process).

A spot of video :


The Accusage Thermo


NB : We first looked at this one in the weekly Strength & Fitness Newsletter (part of the Strength Kit). If you'd like to have it sent to you automatically (free!) each week, just add your email here.

We also discuss a number of training-related books. If you're looking for the full list of the ones I recommend personally, swing by Goodreads. Great site.


Certainly plenty of options available (some more effective than others) when it comes to muscular recovery. Curious : what's your own approach like?


NB : We first looked at this one in the weekly Strength & Fitness Newsletter (part of the Strength Kit). If you'd like to have it sent to you automatically (free!) each week, just add your email here.


During the past week we've discussed a number of great links; on Google+, Twitter, Nuzzel and so on. Here are a few of my favourites.

Thanks again to everyone who watched and joined in the discussion Gymchat 257 - Muscle Activation Techniques [with Core Strength's Eric Seifert and Personal Trainer and Strength Athlete Josh Hewett] - much appreciated. If you haven't seen it yet (or simply want to go over a particular point again), here's the entire video.

GripWalking - SttB Articles

I think I've discovered a new word for Webster's Dictionary: GripWalking. My word processor doesn't like it. Well for a number of years carrying small (or large) weights for distance has been used by strength enthusiasts. The "Farmers Walk" is a familiar strongman (300+ lbs) exercise, although I have heard of carrying a "Fat Man" Blob (end of a 100 lb Roundhead 50+ lbs) about 91 feet. As hunter-gatherers 50,000 yrs ago we certainly carried spears and rocks as weapons, so we're made to do this.

That's a bit much for my term GripWalking. I'm talking about

The most common form is to carry 1 or 2 lbs in each hand, not much for gripping. If you bump up the weight (5 to 10 lbs), use a round object that requires grip effort, now you're talking about GripWalking. I've started this after training with many grip tools: hand crushers up to 250#, Blobs, plates sideways, and balls 3" to 5". Various GripWalking objects are seen in this photo:


The steel ball bearings are what I use but are somewhat pricey. They are also used for massage of sore muscles. I started with a 3.5" ball bearing @ 6.4 lbs and have worked up to a 4" @ 9.5 lbs. I have a 5" @ 18.5 lbs, but can't hold it long enough, establishing my limits for GripWalking. Here's what I do normally:

  • Carry 4" ball bearing in one hand, switching as needed.
  • Carry a knapsack with water, towel, cell phone, etc.
  • If you get tired put the weight in the knapsack for a while.
  • I do this about 3 x per week although it varies.
  • Careful at first, it does more than you think for walking and grip.
This is an accompaniment to Twitterchat 97 - Training for Football : AFL. Enjoy.
I thought I would share a few items that I have used for myself and my footy athletes to keep them strong and as injury free as possible.

Some cost a couple bucks and some cost nothing. Nonetheless they are all hyper valuable items that have definitely made a huge impact upon my playing career.

If you have been playing for any period of time you'll usually have run into a
handful of problems and below are the tools that I have used to fix most of these.

Problems :

-- Separated Shoulders
-- Pulled Torn Hamstrings
-- Osetisis Pubis
-- Cramping
-- Back Pain Irritation
-- Grand Final Level Performance

TRX -- absolutely awesome tool for rehabbing shoulders and building critical upper back strength; also has great value for advanced core workouts, single leg strengthening, and stretching/opening up hips and shoulder joints.

Ultimate Sandbag -- these are the absolute best tool for building full body strength and fitness; especially when it comes to developing unilateral strength, power, and anaerobic endurance with a microscopic learning curve.

I would recommend athletes have a strength pack.

Training Video --

Kettlebell(s) -- the kettlebell has probably made the biggest difference in my playing career and longevity.

I used to constantly pull/tear hamstring muscles after implementing a steady diet of swings and single leg RDLs - these injuries have basically disappeared. Also great tools for doing non-foot impact conditioning as well as when used with get-up drills great loaded mobility for athlete. I personally get my kettlebells now from Christian's Fitness Factory - really great product and price with great service and people to back it. I would recommend athletes have 1 heavy kettlebell 24-32kg and 2 light kettlebells 12-16kg.

Vibram 5 Fingers Shoes -- I have just added these in the last year or so and nothing has more quickly 'activated' on turned on my posterior chain (this muscle that make your run fast, cut sharper, harder to tackle, and kick further) you can do all the soft tissue and mobility work in the work and nothing works faster than these to turn that stuff on.

Celtic Sea Salt + BCAA Powder + Glyco-Charge/Waxy Maize -- this the ultimate cramping cure we play in very hot weather (sometimes up to 110F) and cramping is very common. When I put this concoction into play I never cramp and I usually have more than enough 'go'. Plus with the waxy maize as opposed to other sugars it is very easy on the GI tract.

Tens Unit -- whether it is a bad back or dicey shoulders or hamstrings, I happen to have had all 3, these little units are the best and will aid recovery very quickly when used with a lot of ice. I have more than once recovered a moderately pulled hamstring using one of these units and ice to well enough to play levels very quickly.

LaCrosse & Golf Ball -- they aren't very sexy and if you don't have enough cash to pay for very regular sports massage you need these two little items, with as much running as is done in footy and other field sports the soft tissue of the feet and legs need some TLC. I have spent hours on these units and there always seems to be some more work to be done. The hidden bonus here is that you gain a new level of body awareness.


Troy M Anderson

Become a Fan of Kettlebell Fat Loss
Have a Question About Kettlebells Send me an Email
Lose Fat With Kettlebells
Join Our FREE Kettlebell Fat Loss Community

Whether you're a gym owner, a male fitness fanatic wanting to lift weights with your girlfriend, or a fit woman trying to find other ladies to work out with, you might find yourself wondering why are there so few women in the gym. Is it possible that the gym you own or work out at is as repelling to women as the seedy sex shop they wouldn't be caught dead in? And if so, what can you do to turn this around? What marketing strategies can you learn from the non-creepy sex shops that are always, always crowded?

I'm not saying your gym should be filled with half-naked women
sporting novelty items. What I am saying is that you could take a hint
from nice, clean stores which revolutionized the way many women looked
at sex shops and tapped into a whole new market. What separates stores
such as Good Vibrations or Fascinations from the XXX Adult Store even the bravest women won't venture near? Read on.

1. They're clean and well-lit.

Very few women like to shop...or work out... in a dungeon. Granted,
gyms are not always the cleanest of locations. People work out hard.
They sweat. We get that. But seriously, gym owners - clean up your
shit. Your mom doesn't work here. Make sure your bathrooms and
changing works have working locks, soap and toilet paper. Pick up the
pile of sweatshirts on the floor. Clean the floor. Pick up the piles
by the reception desk. And change the light bulbs. And if you're
looking for a gym you hope your lady friend will like, just
remember - an unlit and filthy gym is not attractive to women.

2. Greet every (potential) client or customer.

The problem with the creepy, smelly sex shop is that it attracts
creepy, smelly people. What's the best way to prevent this? Shine a
light on it. This strategy is actually used in convenience stores to
prevent shoplifting. And it has the added benefit of making people
feel welcome. Even if people keep to themselves during their actual
workout, nobody wants to be ignored. Create a pleasant and friendly
environment and you'll build customer loyalty.

3. Something for everyone.

A good sex shop has something that meets the comfort and tolerance
level of a wide variety of of customers. Not looking for hardcore
porn? Massage oil is pretty sweet and innocent. As are Halloween
costumes. Whether someone's looking for bachelorette party favors or
items to stockpile in their dungeon (er, basement), they can find what
they need in the good, well-lit sex shop.

How would this work for your gym? Simple. Make sure your offerings are
acccessible for the diverse needs of your client base. What does this
look like? Dumbbells that start at lower weights. Cardio machines and
even weight machines for people who will not be weaned off of them
quite yet. Kettlebells, TRX systems and bumper plates for your
hardcore clients. And a wide range of classes for all skills and
levels.

I was recently fortunate to get my hands on a copy of 'Functional Correction'; a manual written by Tim Hull, a man who has worked in the Health and Fitness Industry for over 15 years. He has specialised in Personal Training, Massage Therapy and also Physical Therapy. This hands-on experience, combined with his understanding and theoretical knowledge, has resulted in a manual which I believe is not only an important resource for beginner to advanced level trainees, but also an invaluable resource for Trainers and Coaches alike.

Introduction

Sadly, in recent years, we have all become more sedentary, definitely at home and often in the workplace. This increasingly sedentary lifestyle has caused poor posture and movement patterns and has seen a gradual decline in strength and flexibility levels in individuals. This leads to a higher risk of injuries which negatively affect performance and quality of life. But it doesn't have to be this way!

If you want to prevent future injuries, recover faster from an ongoing injury, or simply improve your general function and performance, then you MUST read this manual! I've had a chronic history of both lower back and neck pain and I wish I'd known about these corrective techniques earlier! I have tried these exercises and I like them. They have been beneficial for me and I will continue to incorporate them into my daily routine.

The Muscle of the Manual

I'll call the main body of this book the 'Muscle' of the Manual. It's meaty. By that, I mean it contains a great deal of volume and is strong in both explanations and instructions. This Manual explores in depth, some of the reasons why we are more prone to injury. It discusses a common cause of injury; muscle imbalances.

You'll learn about particular groups of muscles which tend to be excessively strong or weak. You'll learn about areas which are often overlooked, yet which are important to address. You'll also be supplied with the fantastic '7 Daily Essentials', exercises which hit the majority of problem areas and help promote a more mobile and healthy body. This section in particular, is one you do not want to miss!

Through comprehensive explanations and photographs, you'll also learn the difference between Mobility and Flexibility Exercises and when the right time is to use each one. And by reading this manual, you'll also learn ways to activate weak muscles, loosen tight muscles and eventually correct problem areas.

The Manual continues on to discuss the aspects and importance of Recovery. Nutrition, various stretching methods and Self Myofascial Release techniques are all covered. By utilising these specific exercises, techniques and new found knowledge, you can then eliminate or reduce pain and work towards building a healthier, more functional body!

Training

The plan is to choose a few exercises to incorporate which are relevant to your current physical condition and abilities. As you become more proficient at these, you may choose to advance to some more difficult exercises.

You don't need to go out and spend lots of money to do these exercises. In fact, for most of the exercises, you don't need anything but yourself and some dedication. If you fancy some exercises which require equipment, they're not complicated pieces of equipment, they're all simple accessories and are easy to find or order.

Final Thoughts

The mobility and flexibility aspect of training is often neglected. Put your new found knowledge into practice! Incorporate these exercises every day and find time for them in your training program and you might just be surprised at the positive impact they'll have on your strength and your overall performance.

This manual is best used in conjunction with the Author's featured YouTube Channels, which offer Exercise demonstrations. The reader will also be provided with a free initial email consultation to help set-up an individualised program and answer any questions they may have about the Manual.

We all want to feel relaxed, move more freely, improve our performance and avoid injuries. If you think you're at your peak without reading this manual, it may be time to think again!

This is an invaluable resource and is certainly worth a read.

Foam Roller work
Foam Roller work.
As strength athletes, we spend much of our training time lifting and moving very heavy weight. These loads place tremendous strain on the body and can lead to tension and improper muscular alignment when performed without proper recovery. I'm sure most of us are aware of just how quickly tight hamstrings (for example) break down proper form on a squat or stone lift! Over time, if the form is not corrected, it's quite possible a serious injury may occur. By applying the techniques discussed below, we can release the tension built-up over time from heavy training and help our bodies prevent injury in the future.

The Science

SMR--Self-Myofascial Release--is the simplest way to use a foam roller. Think of it as "stretching without the stretch". During SMR, pressure is applied to a muscle causing activation of the Golgi Tendon Organ, which in turn signals muscle spindles to release and relax the muscle being worked on. In addition, SMR also breaks down scar tissue and unsticks muscle fascia as you work your way from one end of the muscle to the other.

While this double-whammy of "stretch" and "massage" makes SMR an amazingly efficient prehab and recovery tool, the best part is that it can be applied to your current training program without too much adjustment. A 10- or 15-minute SMR progression at the end of your current routine can serve as a great cool down after a hard day of lifting.

General Guidelines

  • Roll the entire length of the muscle at a comfortable pace.
  • Stop on tender spots for 20-30 seconds and apply static pressure, then continue rolling.
  • If a muscle is particularly tight or sore, roll it briefly and return to it later for a second or third pass after you roll the other muscle groups.
  • Some rolling is better than no rolling at all. If you're pressed for time, select only a few muscle groups to work on and schedule the rest for a later session.
  • The more often you roll, the better; but even 2 or 3 sessions per week will lead to improvements.

When I foam roll, I prefer to begin at my calves and work my way up to the neck. Feel free to experiment and find a sequence that works best for your needs and with your program.

The Techniques

Calves

Foam Roller work for Calves
Foam Roller work for Calves.
Sit with your calves on top of the roller. Use your arms to lift your butt off the ground, placing pressure on the calves. Locking the knees straight puts more emphasis on the gastrocnemius; unlocking the knees puts more emphasis on the soleus and achilles tendon.
Foam Roller work for Calves
Roll to the side.
Rolling onto the inner and outer calves will work the peroneals muscles. To increase the pressure, stack one leg on top of the other.

Hamstrings

Foam Roller work for Hamstrings
Foam Roller work for Hamstrings.
Sit with your hamstrings on top of the roller. Lift your butt off the ground and place pressure on the hamstrings. Lifting your feet off the ground and/or rolling one hamstring at a time will increase the pressure on the muscles.


IT Band and Glute Medius

Foam Roller work for IT Band
Foam Roller work for the IT Band.
Turn so the side of your thigh is resting on top of the roller. Place the foot of the opposite leg on the ground in front of you and use your arms to control the pressure. Be sure not to turn too far on to the front or back of the thigh. To increase the pressure, lift the foot of the working leg off the ground.
Foam Roller work for IT Band
Don't forget the glute.
To work the gluteus medius, place the side of your hip socket onto the foam roller. Make sure you don't lean too far forward or back. Lift the foot of the working leg of the ground to increase pressure.


Quads, TFL and Adductors

Foam Roller work for Quads
Foam Roller work for Quads.
Turn so the front of your thighs are resting on top of the foam roller. Lift your feet off the ground and/or roll one leg at a time to increase the pressure. Be sure to work both the vastus medialis and vastus lateralis by adjusting the angle of your thigh.
Foam Roller work for Quads
Foam Roller work for Quads.
Working one leg at a time, place the front of your thigh on top of the roller. Rock forward and back until you feel pressure right on the hip socket. Use your arms and feet to adjust the pressure.
Foam Roller work for Quads
Foam Roller work for Quads.
To work the adductors, lie face down with the roller parallel to your body. Flex one hip and place your inner thigh onto the roller.

Glute Max

Foam Roller work for the Glutes
Foam Roller work for the Glutes.
To work the glute max, sit with your hands and feet on the floor and your butt resting on the foam roller. Be cautious not to bruise your tail bone as you roll along the length of the muscle. Shifting your weight onto one butt cheek will increase the pressure in that glute.
Foam Roller work for the Glutes
Foam Roller work for the Glutes.
To hit the piriformis, bring the ankle of the working leg onto the knee of the supporting leg, lifting that butt cheek off the foam roller. Adjust the pressure by shifting weight on and off the supporting hand and foot.
Over on EliteFTS, Mike Westerdal briefly notes the value of A.R.T. for those times when an injury is holding you back. Nice one.
Jason Kirby
Jason Kirby.
OK so lets face it, the bodyweight crowd out there doesn't really need to purchase any equipment that couldn't either be made or found, but presuming you're one of those people who wants all the latest and greatest gear, or just someone looking to add a few more tools to the toolbox and try something new. Here are a few pieces of equipment definitely worth looking into, and can add almost an unlimited amount of ideas and variation to your training regime.
So skipping the obvious tools like gloves, belts, straps, ipods, and nonsense of that nature lets choose to look at some of the best ideas out there that require little space, a small budget, and a bit of creativity. Going in no particular order I will give the pros and cons of some of the best equipment I have found out there, broken up into categories.

Suspension Equipment

This comes in all shapes and sizes but there are about 3 really decent pieces of equipment and after trying them all I will have to put my vote on two of them.
TRX
TRX.
TRX Suspension Trainer- this is essentially a webbing system with some foam hand grips, and foot cradles that can be hung on almost anything sturdy enough to hold you, and an optional doorway mount can be purchased if you have no choices left but your door.

Pros: The sky is the limit with this piece and while not everything that can be done with this is difficult you can make up your own exercises or opt to intertwine the straps together and go from two grips to just one. The difference can be huge. I will say that bulgarian split squats, leg curls, flys, power pulls, and t's are personal favorites that can be made more or less challenging depending on the angle you are standing or leaning.

Cons: The price is a bit high for a piece of webbing and all the claims about it being created by a Navy Seal are extremely annoying. If you need ideas you can purchase DVDs, posters, or a virtual trainer, but again you are paying way more than you should be.

EXF Rings- this brings us to the next nifty piece and that is a set of gymnastic rings. Simple and effective, they come in two colors, red and black, and can be hung in similar nature as the TRX although I recommend using something like a truss, pull up bar, power rack, or cable crossover station.

Pros: if you think bodyweight training isn't difficult try holding an iron cross or doing a one arm chin (OAC). The rings add an element of instability that just can't be replicated with free weights. Looking to shore on some size to your shoulders, chest, and back, then flys, push ups, dips, chin ups, and even levers can do just that.

Cons- while not as expensive as the TRX these are not cheap given their simple nature, they are also a bit harder to set up if you're indoors and do not have a sturdy object to attach them too.

Jungle Gym
Jungle Gym.
Jungle Gym- this is essentially a cheaper version of the TRX and an affordable alternative too. Virtually all of the same exercises can be used as well.

Pros- its almost half the price and is even lighter and more portable.

Cons- with price reflects quality, these things aren't as sturdy or as comfortable, but hey, who said exercising had to be comfortable.


Regeneration Tools


There are as many variations as the foam roller, myo ball or massage stick as there are colors in a paint store, but keeping it simple there are a few brands that are worth delving into. The beauty of self-myofascial release is that apart from the speedy recovery time in between workouts, it also loosens up scar tissue, connective tissue, and kneads the muscles, sort of like a sport massage, except its' just you.
PB Elite
PB Elite.
Foam Roller- K.I.S.S. Keep it Simple Stupid! You don't need anything fancy, but what you buy is what you get. I prefer Perform Better's PB Elite Molded Foam rollers, since they last much longer and are a bit stiffer.

Pros- They feel great, they loosen up sore areas, can help with thoracic mobility and they can be used for additional balance training.

Cons- For a piece of foam they aren't that cheap, but unless you want to buy a 6 inch PVC pipe which can be much less forgiving, or go the tennis ball route this is not a bad choice at all.

Myo Ball- essentially a mini, foam, gel, or air ball that may or may not have spikes that does essentially the same job as a foam roller. I like Perform Better's Spikey Ball.

Pros- the spikes get you even deeper, and feel amazing on tired feet.

Cons- the small ball takes longer to get your whole body.

STS Bar
STS Bar.
Massage Stick- I've used tons of these things and I prefer Perform Better's Tiger Tail or the Core Performance STS Bar. They essentially both do the same thing but the STS bar can be attached to elastic band or a cable pulley and used for torso training.

Pros- the stick is much more portable than the previous tools, and can hit places that the ball and roller just plain can't.

Cons- couldn't really think of any, this isn't really necessary, if money is an issue stick with the foam roller.

Snakes on a Face - SttB Articles

Snake Massage

I enjoy many varieties of massage, but I'm not sure this is one of them. Snakes on a Face.

TTK
TTK.
Thumb training is very important for a well rounded grip. Thumb training can be broken up into at least four different types: Dynamic, Static, and Extensor, and Multi-Planar.

The focus of this article will be Dynamic thumb training with the Titan's Telegraph Key, or TTK, manufactured by IronMind Enterprises, but very quickly, I will touch on the other divisions as well.


STATIC THUMB TRAINING

Static Thumb Training is where the athlete pinches something and the thumb, for the most part, does not move over a Range of Motion. This is the way that probably 90% of pinch work is executed, I'd venture to guess. Examples are Plate Pinches and Block Weight Lifts. Here is a video of Plate Pinches and Block Weight Lifts:


EXTENSOR THUMB TRAINING

Extensor Thumb Training is where the muscles on the back of the thumb are the primary muscle group being worked. Rubber band training is a very simple example of the thumb extensors being worked. Here is a video demonstration:


MULTI-PLANAR THUMB TRAINING

I find that Multi-Planar Thumb Training is an excellent way to keep all of the muscles in the thumb healthy and strong. I accomplish this with a bucket of sand. Essentially all I do is stick my thumb into the sand bucket and stir the sand around until the muscles powering the thumb are flushed with blood. Once you feel the pump through your thumb, you can also do some deep tissue massage to work out any kinks. Believe me, if you have any imbalances or adhesions in the muscles in the thumb, you will find out where they are with this exercise. Unfortunately, not a lot of grip strength trainees know about this technique that can help them out so much. Here's a clip:


DYNAMIC THUMB TRAINING

Dynamic Thumb Training is where the thumb moves over a distance. One of the implements that I have been using for Dynamic Thumb work is the Titan Telegraph Key, or TTK. There are other implements on the market that are very similar that you can pick up that have other names, but they all work on the same principle: the fingers and thumb oppose on another, positioned on two separate plates; resistance is placed at the end of a lever arm; and thumb strength is used to move the resistance.

Swedish Massage
Swedish Massage - love it. Photo by Eggybird.
Over at EliteFTS Nathan Williams takes a look at the literature on 3 common recovery techniques : Massage, Hydrotherapy, and Hyperbaric Oxygenation. Good stuff.

Recovery via Fondling - SttB Articles

Ring
Boxing ring, Thailand. Photo by Fight Geek.
Fight Geek notes the beauty of a bit of fondling Thai Massage after a serious training session. Good stuff.
The Grip Master's Manual
The Grip Master's Manual.
In The Grip Master's Manual, a book I think anyone interested in grip strength should read, John Brookfield mentions that one of the secrets to closing heavy grippers, especially the IronMind Captains of Crush grippers, is strength in the last two fingers, or the ring and pinky fingers. He says that strength in these two fingers is what finishes off the close when making a big attempt. I fully agree.

After analyzing my performance over the last couple of years in grip contests, I have identified grippers as one of the events I must work on. Aside from other methods I have been using to bring my crush up, I have been supplementing my normal gripper work with lots of focus on the last two fingers.

There is a multitude of ways to work the last two fingers but I want to share some of the things that I have been doing routinely to work on the last two.

last2_0006.jpg
One thing that I have been using is the IronMind Tug #5. The IronMind Tugs are shorter-handled torsion-spring grippers that are designed specifically with the last two fingers in mind. I will perform repetitions with the Tug #5 and holds for time, each day I do gripper work. The Tug #5 started out tough for me but after much work on it and probably due to some seasoning, it has gotten rather easy and I am considering buying the next level up in an effort to keep progressing on grippers.

last2_0007.jpg
Another tactic I have implemented is called choking. Choking is where you secure the gripper handles down with an object so that they are partially closed. This can be done with a PDA choker, a large washer, or a hose clamp, which is what I use. Hose clamps cost about $1.50 at the hardware store and are a very cheap yet functional option for gripper choking.

last2_0008.jpg
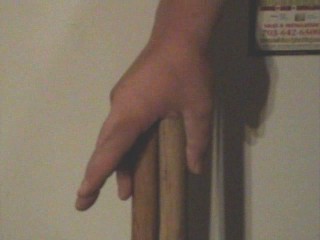
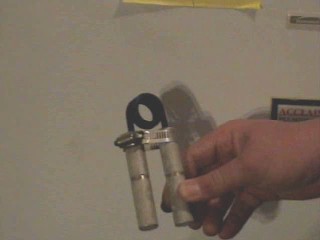
I have choked down a #1 Captains of Crush gripper to the point that the handles are parallel.

last2_0009.jpg
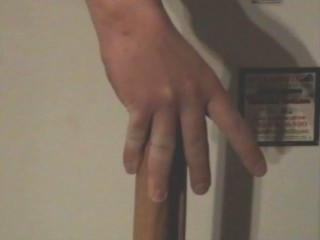
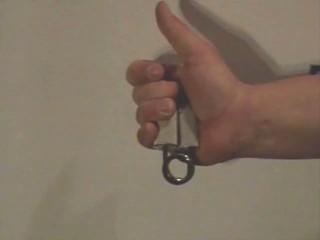
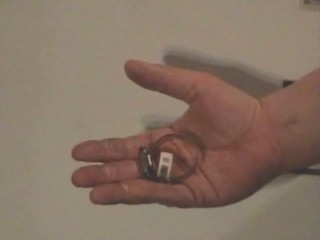
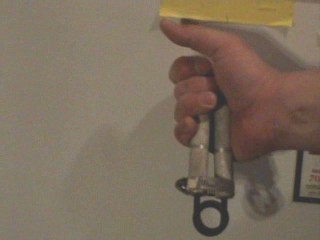
Then, I invert it, like a Tug, and make attempts to close it with only my last two fingers. I have not yet been able to touch the handles together with my last two fingers, but I am down to about a sixteenth of an inch and if I cheat the handles shut and then remove my off hand, I can hold it nearly closed.

Also, I have been working my last two fingers in a static fashion by pinching together the handles of two sledgehammers.
last2_0002.jpg
last2_0003.jpg
I normally perform timed holds with this lift, but I also like to pinch and lift the sledges and then swing the handles back and forth, perform figure eights, and twists with the sledges aloft. This is a great finisher to your last two finger training.

Now that we have an understanding of some of the quality implements out there that we can use to train to lift the Inch Replica Dumbbell, we need to think about how we can use them to make sure we get the most out of them in our time training with them. The following tactics can be used for a thick loadable dumbbell or a Rolling Thunder Revolving Deadlift Handle, both of which I covered in my previous article.

Max Attempts

Probably one of the simplest strategies for trying to work your way toward lifting the Inch is Max Attempts. This involves loading the implements up with a poundage that is close to the 1 RM (one repetition maximum), or the heaviest weight you can perform for a full repetition.

I like this method because I can monitor my progress well with it. If every week you are able to add weight to the implement, then your grip is getting stronger with that implement and eventually you will be strong enough to lift the Inch Dumbbell, especially if the implement you are training with closely resembles the shape, handle size, handle texture, and grip-ripping action that the Inch Dumbbell has.

While you may see gains every single week at the beginning of a program, it is probably more realistic to expect to see some weeks where you improve, others where you stay the same, and still others where you are not able to lift as much as you have lifted previously. Grip training is just like any other type of lifting. Depending on your current health, nutritional state, level of rest and recuperation and other factors, you will feel and perform differently on any given day.

The important thing to remember is when you are feeling good, strive for the PR, or personal record. But if you are not feeling it that day, don't just give up. I think the effort that you are willing to put forth on your weaker training days is what makes the difference in the end. If I stopped my gripping routine every time I realized that my hands weren't feeling the best, I would almost never do a full grip routine. Since I train grip 4 or 5 times a week, my hands rarely feel fresh. I have to force the blood into my hands sometimes to get them to warm up. I have to work thick bar the day after I just worked pinch, so my thumbs often feel weary and feeble. I have to give myself deep-tissue massage in between sets to keep the muscles from cramping up. I know that my hands are just not going to feel well sometimes, but I also know the time I put in on those days is what is going to get me to first place at a contest or is going to get me that next gripper certification, or next completed feat of strength.

When you are feeling good, take advantage of it and try to tack on more weight. Go for the heaviest possible weight you can pull. This may mean you will have to try micro-loading.

Micro-loading is where you add small weights to the implement, weights that might weigh only a pound or so. Most of the time, the smallest weight a gym will have is a 2.5 pound plate (in the U.S.) but there are companies that sell smaller plates. A consistent supporter of the Gripboard, PDA sells Fractional Plates .Click to read more about what they offer.

Fractional plates allow you to work toward making finer gains. Instead of having to jump up 5 pounds by throwing a 2.5 on each side, you can put a 1-pounder on each side and go for a 2-pound PR!

When I want to micro-load, I sometimes use magnets. The magnets I use are called cow magnets. As some of you may know, cows will try to eat just about everything. They wander around the pasture gobbling up grass, but also end up chewing up pieces of metal. Coat hangers, bolts, screws, nuts and other strange pieces of metal have been found in the stomachs of cows, so some farmers purposely feed them magnets in order to attract the shavings from these pieces of metal in their stomachs. These magnets weigh a little more than a pound apiece and work great for micro-loading. I place one on each side of the dumbbell and lift!

Repetitions

You can build the endurance in yours hands by performing repetitions with your thick-handle implements. I will discuss two different ways to do this.

Slow Method

In order to consistently pull big weights, you must work near your 1 RM (One Repetition Maximum) and pull them over and over. Due to the nature of the weights being attempted, the pulls are going to be slow, almost a grinding pace, and that is why this is called the Slow Method.

This method involves placing as secure of a grip as possible on the implement prior to lifting. You should be very deliberate about how you place your hand and make sure it is in the optimal position every time. Take your time, get your grip right and perform good, full repetitions.

When I use this technique, I know I am doing it right when my entire hand feels worn out - fingers, thumb, palm and wrist. I stretch my hand around the handle and grip as tight as I can. I pretend my hands are like eagle talons trying to snap through a branch, and then pull until I can perform no more repetitions. Once I hit that point, I switch hands. Usually when I set the implement down, my grip has slipped a bit, or the contact with the floor has shaken the implement loose, so after I set the implement down, I normally take my hand off and the re-set my grip.

Quick Method

It's fundamental that if you constantly work close to your 1 RM, that you can burn yourself out, and possibly cause injury, so I also incorporate a quicker form of repetition method in my thick bar training.

With the quick method, the grip you apply is not going to be optimal. Instead of setting your grip on the implement with care and detail, you will just bend down and pull it the instant you contact the gripping surface.

This method is very ballistic in nature and teaches you to initiate as much of your strength as possible on the implement in a very short time span.

When I train with this technique, I feel it most in my finger tips and in the thumb. I think the reason for this is because I am not able to apply my calculated hand-wrapping technique and thus the weakest areas of the hand (fingertips & thumb) end up doing the most work to keep the dumbbell from slipping out of the grasp. After several sets, my hands are worn out.

2  

Pages

Powered by Movable Type 5.2.7

Tags